Some methods for colouring the surface of metal
June 18, 2008
with examples from Etsy
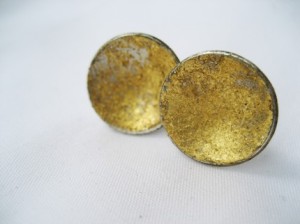
- Heating copper unevenly with a torch can create interesting patterns of oxidisation (marbled orange, black, brown).
- Don’t pickle!
- The surface can be protected, for example, with a rouge polish.

(from thenoisyplume at Etsy)
- Leaf, powders, and foils can be applied to create a more precious and/or more colourful appearance.
- Apply Japanese gold size to the desired area and allow it to dry before applying the leaf or powder.
- To apply leaf rub a sable brush against your cheek to generate static electricity and use the brush to break and lift pieces of leaf.
- This finish is quite delicate and works best when inset, for example, in a domed or textured surface.
(from willaburke at Etsy)
- Enamelling is a great way to apply vivid colours to metal. Enamels may be translucent or opaque and can be used in conjunction with foils, cloisonné wire etc.

(from Studio94 at Etsy)
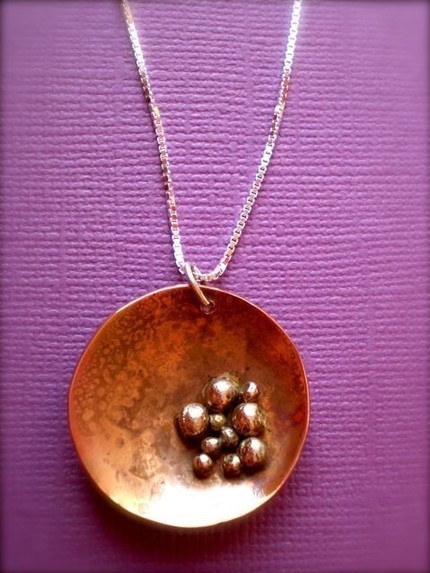
- A copper plating may be obtained by placing metal in a pickle that has had copper in it.
- You can use a variety of store bought (such as antiquing solutions) or hand mixed chemicals to create various patinas on metals. Liver of Sulphur (Potassium Sulfide) can be used to darken metal and an ammonium chloride solution can be used to create a characteristic green patina on copper. A number of patina recipes can be found in ‘The Complete Metalsmith’.

(from AntiGenre at Etsy)
Fabric wish list *sigh*
June 16, 2008
Very hungry caterpillar from the Eric Carle Museum of Picture Book Art


‘Kaakaopuu’ Marimekko from ReproDepot

Liberty ‘Ianthe’ from Sanderson Interiors

Day of the Dead from Harts Fabric

Other fabrics I’d like (if they existed):
Jonathan Livingston Seagull

Black Rabbit of Inlé (from Watership Down)

Thick kelp/seaweed


Neurons


Big ginko leaves on a pale blue background

Silver ring with a bezel set cabachon
June 12, 2008

MATERIALS: 3mm diameter standard silver wire (about 7cm), 0.6mm standard silver sheet (1.5cm x 1.5cm) and 3mm fine silver bezel strip, 8mm cabachon (transparent green semi precious stone – not sure of the name)
TECHNIQUES: ring forming, annealing, sawing, soldering, filing, sanding, bezel forming, stone setting, burnishing, polishing
TOOLS: wheatsheaf ring gauge, triblet, vise, rawhide mallet, saw and blades, soldering tools, ring clamp, flat file, wet and dry paper, fine wire, end cutters, scissors/snips, bezel pusher, burnisher, steel wool, tripoli mop, rouge mop, ultrasonic cleaner
PROCESS:
- Use a ring gauge to determine the desired ring size. Mark the ring size on the triblet.
- Anneal a piece of silver wire (best to have some excess as the ends won’t curve very well). Use a mallet on the wire over the triblet to form a ring shape. To close the circle mallet the ring at the highest point. Make the ring a bit smaller than the desired size and then gradually move toward the marked size.
- Saw at the middle of the intersection of the wire ends. Saw through again and solder using hard solder.
- True up the ring on the triblett with a mallet and make sure that it is flat.
- File and sand the bottom and sides of the solder seam to hide it.
- For the bezel: make a fine wire loop and place over the cabachon. When the wire loop fits perfectly over the gem, unravel the loop and use the wire to measure the length of bezel strip required. (If anything, it’s better to cut the strip a tiny bit shorter than you think you might need, as it can be stretched a little if necessary.). Trim the height of the bezel if necessary (it should be roughly half the height of the stone).
- Form the bezel strip into a circle on a triblet and check that it fits the gem well (isn’t too big). Solder using a small piece of hard solder (be careful because fine silver has a lower melting point than standard silver). Check the size and stretch on a triblet if necessary.
- Sand the edges of the bezel so that it is even and fits snugly against a silver sheet without any gaps.
- Solder an oversized piece of silver sheet to one side of the bezel strip. Use an excess of silver medium solder placed on the outside edge of the bezel and concentrate on heating the base. Use end cutters to cut off the excess silver sheet and then file and sand the outside of the bezel to form a nice little cup.
- Place the ring in a ring clamp. File a flat space on the outside edge of the solder seam, where the bezel will sit. Clean up the ring and bezel with steel wool or emery in preparation for soldering.
- Carefully arrange the ring and bezel and solder using an excess of silver easy solder. (file or sand afterwards if there is too much). Make sure all the solder has melted before pickling.
- Gem setting: clean the inside of the bezel using some steel wool and place the gem inside the cup.
- Use a bezel pusher to push the bezel up around the gem and then a burnisher to finish this off (and to shine the bezel).
- Polish the ring using the tripoli mop. Clean using a soft brush and detergent and if the desired result is achieved proceed to polish with the rouge mop (black caking may mean that you need to go back and do more tripoli polishing before continuing with the rouge).
- Clean off any excess rouge using the ultrasonic cleaner. (Note that it’s possible for poorly set stones to become unstuck in the ultrasonic cleaner).
LESSONS LEARNED:
- I screwed up this ring up at almost every stage! The main thing that I learned was that many mistakes in jewellery are fixable, at least to some extent.
- I put the gem and bezel cup in the same bag and they got stuck together (the gem had to be drilled out).
- I thought the all of the solder had melted when joining the ring to the bezel but it hadn’t. My teacher had to resolder but the bezel was soldered off-centre the second time around.
- I used the wrong technique with the bezel pusher and mangled my bezel quite badly (this could have been fixed with a sharp enough tool, but unfortunately there wasn’t one to hand).
IF I HAD MORE TIME: I would have filed and sanded the ring solder seam more.
◊ If you want to work out the exact length of metal required for a ring the formula is:
Length required = Diameter of the desired ring size X ∏ + double the thickness of metal
P.S.:
This week is Coutts London Jewellery Week so there’s plenty of special jewellery stuff going on:
Catwalk shows
Satellite parties
Collection launches
Exhibitions
Open houses
Promotional offers
Educational seminars
Window displays
Cocktail receptions
Treasure hunts
Bling & Buy sales
End-of-year shows
Sales
Auctions
Workshops
Demonstrations
To achieve a matte finish on metal you can use….
June 4, 2008
…Steel wool (gives a bright matte finish)
Pumice
Matting mop
Frosting mop
Sand blaster
Bead blaster
Abrasive blocks such as Garryflex abrasive cleaner
Various mops, brushes and papers
It tends to be best to get the piece completed and polished before the matte finish is applied.
Note that matte finishes get dirty quickly (especially frosting). They can also wear off with repeated rubbing (e.g., rings will eventually become shiny).

(Untitled by Dusanka Vujovic – seen in International Art Treasures Web Magazine)
Hurrah!
June 1, 2008
The William and Judith Bollinger Jewellery Gallery finally opened at the Victoria and Albert Museum last week. I can’t wait to take a look.

